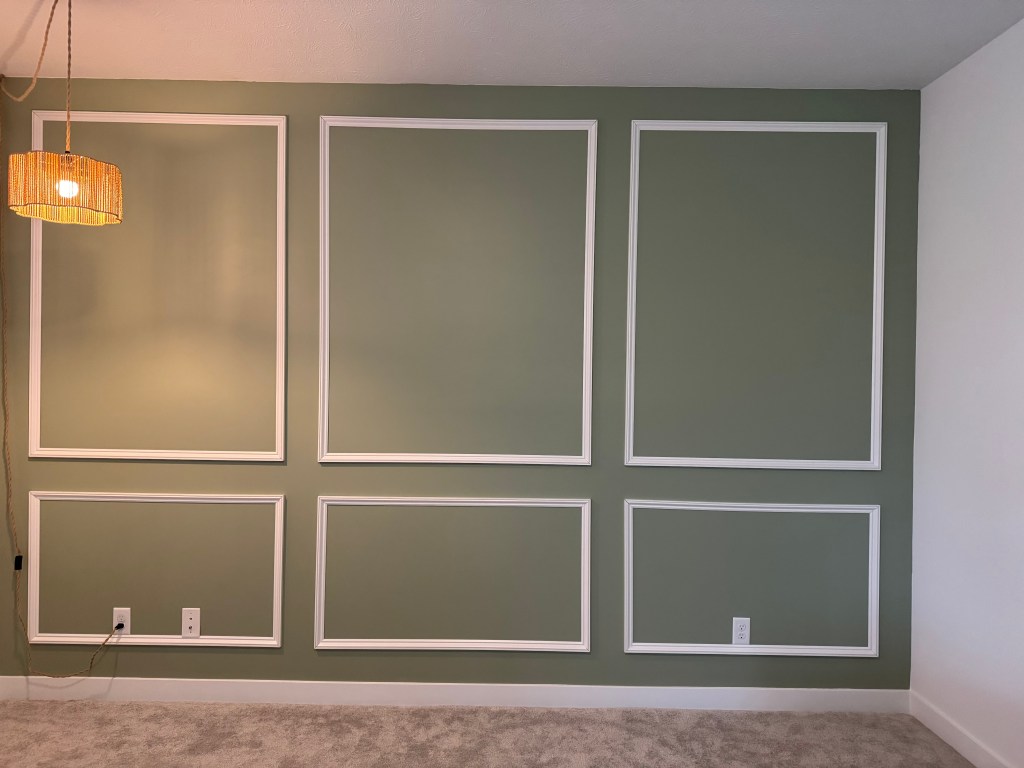
My parents are always up to something creative, but their latest project might be my favorite yet. They built an accent wall in their living room. It started out as a simple paint refresh and turned into a full-on DIY adventure, complete with multiple hardware store stops, a few minor injuries, and plenty of laughter.
The Inspiration
When I asked what inspired them, my mom immediately said,
“I saw it on Instagram! I’m just trying to get rid of that builder-grade look.”
My dad, on the other hand, admitted,
“I didn’t want to do it. It looks good. I’m just saying.”
It all started with an empty wall that just felt too plain. They painted it first, thinking that would be enough but after living with it for a bit, they both agreed it still needed something more. So the idea for a box-trim accent wall was born.
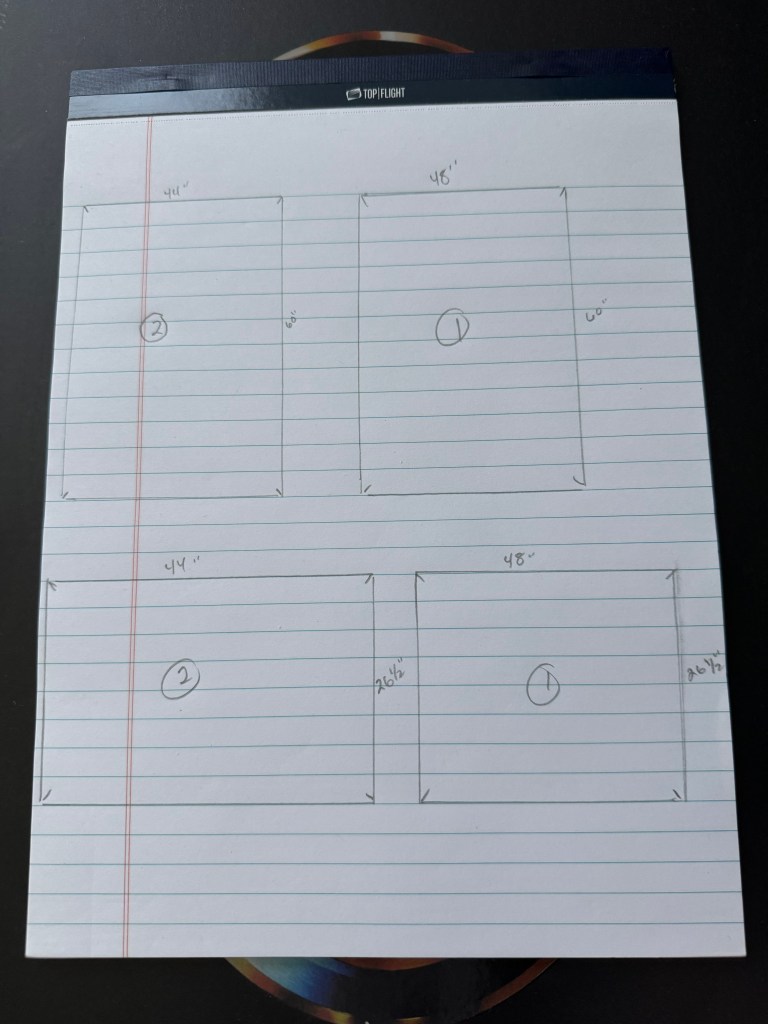
Planning the Layout
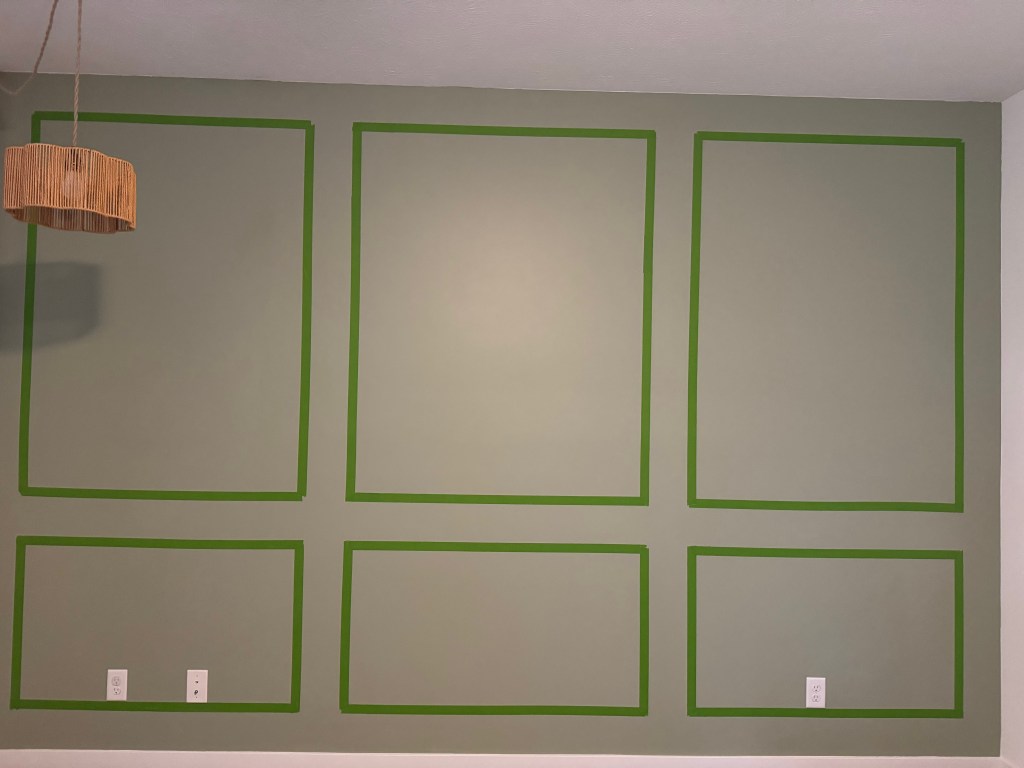
They began the old-fashioned way: with pen and paper. My dad measured (and re-measured) the wall to decide how many boxes they wanted. Once they had a rough plan, they taped out the design on the wall and left it up for a couple of weeks just to make sure they liked the layout before committing.
When it was finally time to start, they made a list of supplies and headed out for what was supposed to be a quick trip to Home Depot.
Except… they accidentally drove to Lowe’s.
By the time they realized, they were already at the back of the store in the tool section. So, naturally, they turned around, left Lowe’s, and went to Home Depot where they bought a new level, nailer, nails, and caulk. Unfortunately, the wood selection was a letdown. My dad tried cutting a piece himself, but it chipped. “Junk,” he said. My mom wasn’t impressed either.
So off they went again. This time to Menards, which they both agreed had the best wood selection (and cheaper prices, too).
After all that, they stopped by our house to borrow a saw and a battery… but ended up visiting the rest of the night instead. The next morning, they finally got to work.


Building the Wall
Once they got started, things moved pretty quickly. Between cutting, nailing, and double-checking every measurement, they worked from about 10:30 a.m. to 2:30 p.m., with a break for lunch and some distractions from the football games (the project was completed on a Sunday).
The wall features 12 pieces of 8-foot MDF base cap molding, about 1.5 inches wide, attached with a pin nailer and finished with paintable caulk.
There were a few battle wounds along the way…my dad managed to cut his finger (no idea how) and hit another with the nail gun. Luckily, it didn’t go through. While recalling the nail hitting his finger, he went on a tangent about the time he stapled 2 of his fingers together. It was very traumatic so if you ever get the chance, be sure to ask about it. He swears it’s the worst pain he’s ever felt: the staple, not pin nail.
What They Learned
Like most DIY projects, there were lessons along the way.
“Cut a little extra and dry fit before cutting again,” my dad said.
“And if you’re doing a big wall, you can’t do it alone — those top boxes were five feet tall!”
He also offered some advice for anyone trying this at home:
Nail in the center of each board first to help line it up before securing the rest. Don’t rush the measuring: “Measure, remeasure, and then measure again.” Use a baby wipe to smooth out caulk for a clean finish. “It takes it right off the wall. No mess.”
When I asked what the hardest part was, they both laughed.
Dad: “Figuring out the spacing to make it look uniform.”
Mom: “Listening to your dad complain about it and waiting on him to do it!”
And the best part?
“We bought exactly the right amount of wood,” my dad said proudly. “Didn’t cut a single piece wrong.”

The Finished Look
The finished wall completely transformed their living room. The clean lines and subtle texture make the space feel more custom and collected. Exactly what my mom was going for. My dad says,
“It’s up there. It’s up there good. It’s up there straight. It looks good.”
Which, coming from him, is high praise.
Their next step is buying paintable outlet covers so they blend in seamlessly with the wall.
My mom’s already dreaming up their next project: wood slats in the entryway. My dad’s a little less enthusiastic, but I think we all know how this story ends…with another beautiful wall and a few more laughs along the way.


Final Thoughts
What I love most about their accent wall isn’t just how good it looks (and it really does look great). It’s the mix of teamwork, patience, and humor that went into it. DIY projects can be messy and unpredictable, but they’re also full of stories and this one perfectly fits them: equal parts determination and comedy.
